Charissa

About Charissa

Posts by Charissa Castillo:

Augmented Reality Image Transfer App

Drawing in AR Mode

Before you start drawing in AR Mode, you will need to create an anchor.

In this case, the anchor is part of a playing card. An anchor literally anchors your digital image to the same position of an object in the real world. As long as the anchor stays in view of the camera, Da Vinci Eye will know where to place your digital reference image.

Augmented Reality Anchor For iOS Drawing App

To make an anchor press Tools, select the AR menu, press Anchors, and then + Make Anchor.

Now, press Take Picture. Here, you take a picture of your anchor.

Next, crop the image so it’s just the anchor. You don’t want the surrounding area visible.

Finally, you need to enter the approximate height and width of your anchor. Da Vinci Eye will automatically calculate the second dimension. If you input the width, it will automatically calculate the height. You can also change the unit of measure from inches to centimeters.

Now, if your anchor is in view of your camera, your reference image will be a superimposed relative to its position.

When you are drawing, it’s a good idea to tape the anchor in place. That way it doesn’t move around. You can hold your phone in your hand while you draw, however, this is very difficult and not recommended.

We do highly recommend suspending your phone above or in front of whatever it is you’re drawing on. For example, you can place your phone on top of a tall glass. If your phone doesn’t have a case, it may slide around. To stop the phone from moving around, just place two cut rubber bands on top of the glass.

You can also buy or make a stand. This is a cheap microphone boom stand and a cell phone holder attachment. With this setup, you can easily draw using an easel. You can check out these two products in the Product section of the app.

You may notice the phone’s camera going in and out of focus. It is set to auto-focus by default. Once your anchor and drawing surface are in focus, you can turn off auto-focus by pressing Tools > AR > Focus Lock. This will turn off auto-focus.

To position your reference image on the paper. You should pinch the screen to bring the full camera feed into view. Then press the Move button to move your image relative to the anchor. You can enlarge, shrink and rotate the image.

Make sure to unpress the Move button when you are finished. This locks the reference image in place.

You can now move and zoom the camera without moving the reference image. Press the Opacity button to adjust the transparency of the reference image. To make the image more transparent, move the slider to the left; to make it more opaque, slide it to the right.

You can also stylize images by using Filters, or break down images into layers by color value by using the Breakdown feature. You can learn more about filters and the breakdown feature by going to the Learn section of the app.

Now it’s time to start drawing!

First, trace the important parts of your reference image. Don’t forget, you can zoom in and out without disrupting your drawing to get the fine details, then add the finishing touches by adjusting the opacity all the way up and using the Strobe feature to compare the reference image to your final drawing.

To learn more about individual features, try completing the challenges on the home screen, and also check out the Learn section of the Da Vinci Eye app.

As always, if you have any questions about AR Mode, feel free to contact us at info@davincieye.com or by using the email button at the bottom of the home screen.

—

You can also check out our video on how to get started with AR Mode below, or subscribe here for more tutorials.

Camera lucida Camera Obscura app Da Vinci Eye Projector

Strobe Tool Tutorial

To start off with, we’re going to use an image with a lot of shadows in it.

Art Projector App Video Tutorial

We’re going to magnify an image a little bit for this tutorial.

Art Projector App Tutorial

Using Da Vinci Eye, it’s really easy to put lines down on your paper that match where things should be in your drawing. But if you’ve ever tried to shade your drawing or use it to reference where shadow should go, that becomes a lot more difficult.You end up not being able to tell the difference between what’s the reference image and what you’ve shaded. You also can’t tell how dark or light you shaded something in, in comparison to their references.

To fix this, we use the Strobe tool. The strobe tool fades the image in an out, and this lets you see the difference in the shadows.

The goal when you are drawing in this mode is to try and get what you are drawing to look indistinguishable from the reference picture. So when the image fades in and out, you should stop being able to see a difference.

You can use the speed slider to make the image fade slower, or you can make it fade faster, whatever works the best for you.

And that is how to use the strobe feature to make realistic drawings with Da Vinci Eye!

If you haven’t already, check out the app! It’s available on iOS and on Android. If you have any questions whatsoever, please reach out via email. You can use the email button in the app or directly at sam@davincieyeapp.com.

And as always, if you make something cool, please tag us. We would love to see it. We’re on all the social medias: Instagram, TikTok, Facebook, Twitter. Find us, follow us, and tag us. We’re at @DaVinciEye or @DaVinciEyeApp, and we’ll even repost your work.

One more thing… Make sure that you have your notifications turned on or subscribe to us on YouTube, so that way you can get notified for when the next lesson drops.

Never stopped creating, guys!

—

Strobe Tutorial Video:

Da Vinci Eye App Classic Mode_0008_Screen Shot 2021-03-15 at 6.15.19 PM

How to Draw with Da Vinci Eye Using Classic Mode

This drawing mode uses your phone’s camera feed and lays a transparent picture you want to draw over that camera feed. If you look at your phone’s screen, you’ll be able to see both the picture you want to draw and the place where you want to draw it at the same time. This lets you easily trace an image onto any surface.

To get started, you need to place your phone on top of a tall glass.

If your phone doesn’t have case, it might slide around when you touch it. This will make adjusting settings while you’re drawing very difficult. To fix this, cut two rubber bands and place them on top of the glass about an inch apart. This will stop the phone from moving around.

You can position the phone any way that is easiest for you to draw. If your phone is positioned to the left or to the right, you can reorient the toolbars by tilting the phone upwards.

You should make sure you can see both the feed from your camera and the transparent image you want to draw. If your camera feed is black, you might need to go into your phone’s settings to make sure Da Vinci Eye is allowed access to your camera.

Now it’s time to position your picture on the paper. Press the move button, and using one finger you can pan the image…

Using two fingers, you can zoom, shrink and rotate the image.

When the move button is unpressed the image and the camera will be locked together. This lets you zoom out to see your drawing as a whole or zoom in, so you can draw fine details.

Finally, to make your image more or less transparent, you can use the Opacity slider.

Move the slider to the left to make your picture more transparent and to the right to make it less transparent.

Check out our Learn section to watch Da Vinci Eye instructional videos:

Or try completing the challenges at the top of the home screen to learn things like: How to record time lapse videos of your drawings, how to add filters to pictures to make them easier to draw, and how to use advanced features like the strobe to make super realistic drawings.

As always, if you have any questions or need any help, shoot us an email using the email button at the bottom of the home screen.

You can also check out our video on how to get started with Classic Mode right here:


How to Draw an Elf

Hey guys! My name is Sean, and I’m an artist/instructor with Da Vinci Eye. Because it’s the holiday season, we are going to learn how to draw an elf!

I’ll be drawing this on my tablet for you to easily see, but feel free to use a pencil and paper. You can also follow along with the tutorial step-by-step using Da Vinci Eye for iOS and Android. The app lets you trace along with my drawing to help become more comfortable and understand exactly what I do.


Let’s start this drawing out with three circles to help us shape up the body.

How to draw an elf for christmas

I’m using simple shapes of ovals and rectangles to block out the body, torso, the arms and the legs.

basic drawing lessons

As you know elves have pointy ears and pointy shoes. So I’m going to start with the bottom and put in two curled shoes.

Lessons for kids on how to draw an elf elf shoes drawing

Next, we can draw out the clothes. I added some triangle ends and buttons to a shirt for detail.

elf clothing
step by step elf drawing


With a round of face, we can put in those 2 pointed ears we talked about earlier.

elf drawing video


The face doesn’t need to be super specific, a happy smile, and two elbows for eyes can totally work.

happy elf drawing


To finish out the body, we can put in the arms and some mitten hands for those cold winter nights.

quick lesson on how to draw an elf

Last is the big warm hat…

Santa's elf

This is also a great time to add in some shading and clean up those initial sketch lines you put in.

Cute Elf Drawing DIY Christmas gift ideas

And as always… Remember to sign your art because you did a great job!

If you want to find more of my art, follow me on Instagram at
@Phoenix.Animations. Be sure to check out the Da Vinci Eye app, as well as subscribe here for more tutorials.

You can also check out our video on how to draw an elf right here:

How to Draw a Toucan

Hey guys! It’s Sean, an artist instructor with Da Vinci Eye. Today, we’re going to be learning how to draw a toucan.

I’ll be drawing this on my tablet for you to easily see, but feel free to use a pencil and paper. You can also follow along with the tutorial step-by-step using Da Vinci Eye for iOS and Android. The app lets you trace along with my drawing to help become more comfortable and understand exactly what I do.

So let’s get started.

Remember with every drawing to start out light. So using little pressure with a pencil, draw three circles – the head, the body, and the eye.

Easy Toucan Tutorial Step by step lesson

Now we connect everything…
Drawing tutorial with Da Vinci Eye App

And add a Y looking line to indicate the wings, since we’re looking at the back of the toucan.
Easy bird drawing for beginners

After that, I’m going to go in and add some more lines for the tail feathers.

Best Drawing App

As you can see, these don’t have to be perfect.

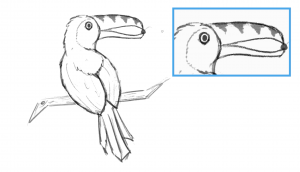
And now we add the main event – the long beak.

I decided to give my toucan a little berry to hold onto, but you could also just have the beak closed.

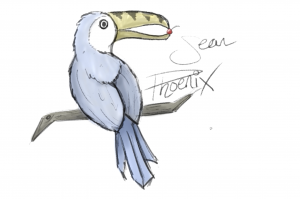
Last but not least, your toucan need some environment. So let’s put it in a tree branch with a little bit of texture.

After this, I just go in for some cleanup. So I make lines darker and add some feather and beak details.

And as always remember to sign your art because you did it and you should be proud of yourself!

Now, of course, toucans are very colorful, so don’t hesitate to do some quick color and shading.

If you want to find more of my art, follow me on Instagram at @Phoenix.Animations. Be sure to check out the Da Vinci Eye app, as well as subscribe here for more tutorials.

You can also check out our video on how to draw a toucan right here:

Have a great day, and we’ll see you next time!

How to Draw a Panda

Hey guys! It’s Sean – I’m an artist-instructor with Da Vinci Eye. Today, we’re going to learn how to draw a panda.

I’ll be drawing this on my tablet for you to easily see, but feel free to use a pencil and paper. You can also follow along with this tutorial step-by-step using Da Vinci Eye App for iOS and Android. The app lets you trace along with my drawing to help become more comfortable and understand exactly what I do.

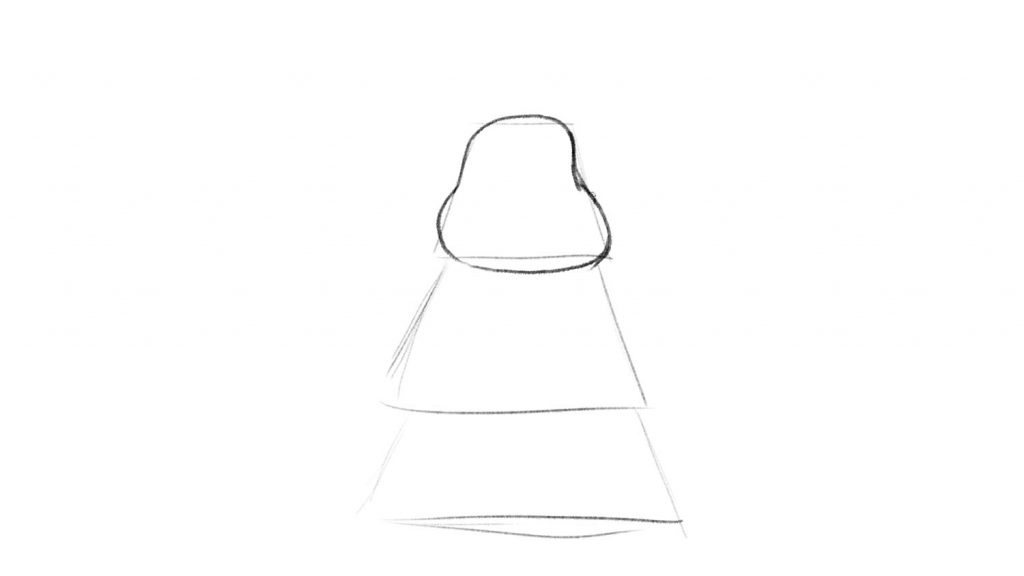
So let’s do this! Remember to start out light, so using little pressure with the pencil, draw three trapezoids in the shape of a tree.
Easy Panda Drawing Lesson

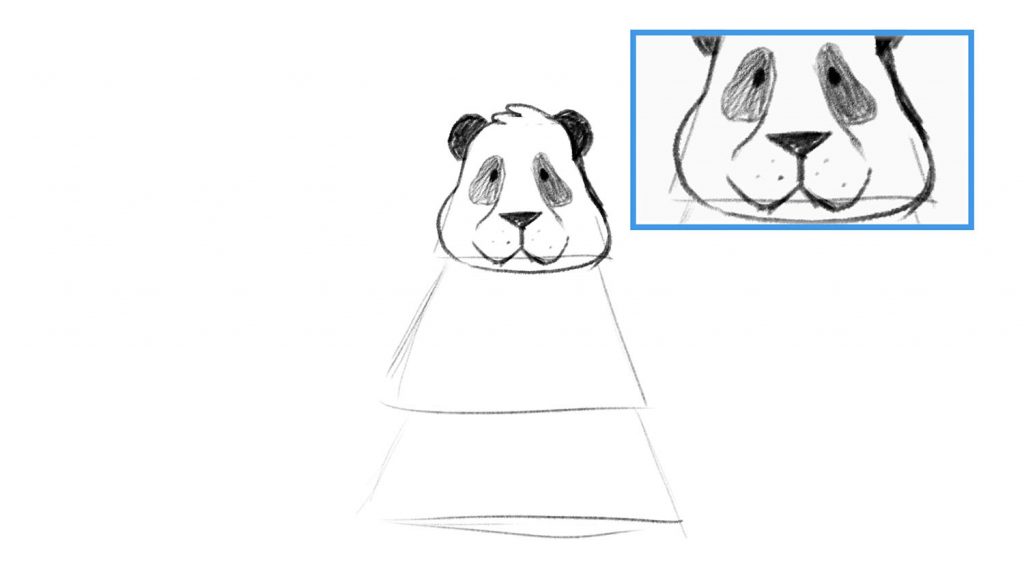
Now, starting with the top, I want to give my Panda a pear shaped face.
Panda pear shaped face

For this guy, I’m also going to add some tufts of fur on the top of the head.
Step 3 in how to draw a panda

Next we put in the ears and color them in real quick, a triangle nose and two small oval eyes.
Drawing of panda with ears

Now we take the nose and extend out the mouth and muzzle.
Panda drawing tutorial

We’re aiming to have the muzzle extend up and form the characteristic black fur around the eyes. Don’t hesitate to raise your eyes and place them in a different spot; I do this all the time.

Step by step panda drawing lesson
Darken eyes of panda drawing

Before we move into the second section, we need to get the Panda some bamboo to eat.
Drawing of panda eating bamboo

Since the panda is actively eating, we can assume the bamboo will be broken partly in half. Hence we should make one side of the bamboo more slanted than the other. I also put in some leaves to make it read better to the eye.
Sketch tutorial of panda

Now that we have the bamboo, this indicates where the paw grabbing it needs to be.
Panda eating bamboo easy drawing lesson

We can also extend the shoulder down to the arm and add a second line coming down from the hand. Make sure to erase any overlap while we’re here!
Tracing a panda with iphone app

For the other arm, I had mine more relaxed. The biggest thing to remember here is to stay mostly within your trapezoid section. It’s okay if the arm extends a bit past like mine does, but don’t go as far as to hit the ground.Friendly panda sketch drawing

For the third section we put in two paws that are facing towards you.
Animal sketch drawings for beginners

That way you can put in the toes and padding underneath. Then put a slightly curved line between the two feet to connect everything.
Cartoon panda drawing


Now here’s the fun part – coloring in and cleaning up!
Panda black and white pattern

As you can see, the Panda has a very distinct coat patterning…
Cute panda drawing with video tutorial

As a final note, I always like to add in some environment. So here I get the Panda some ground to sit on and do some abstract lines to show bamboo growing behind him.
Panda eating bamboo

I use an oval to show the segments of the bamboo, but I’m not trying to add too much detail or pushing the pencil into hard. The background is there to enhance the character, not distract from them.

And as always, don’t forget to sign your art! You did a great job. 🙂

If you want to find more of my artwork, follow me on Instagram at @Phoenix.Animations. Be sure to check out the Da Vinci Eye app, as well as subscribe here for more tutorials.

You can also watch the tutorial on how to draw a panda below. Have a great day, and we’ll see you next time!


How to Draw a Turkey

Hey guys! My name is Sean and I’m an artist-instructor with Da Vinci Eye. Today, we’re going to learn how to draw a turkey!

I’ll be drawing this on my tablet for you to easily see, but feel free to use a pencil and paper. You can also follow along with this tutorial step-by-step using Da Vinci Eye App for iOS and Android. The app lets you trace along with my drawing to help become more comfortable and understand exactly what I do.

Let’s start this drawing out with three circles to help us shape out the body, the tail feathers and the smaller circle head.

Drawing lessons with iOS app

Now we connect the head with the body and also sketch out the giant wing.

How to draw a turkey with da vinci eye app Da Vinci Eye App for iOS and Android Drawing Lesson

Our Turkey is looking fantastic! So let’s take these basic shapes and give them more form.

Easy bird drawing tutorial

I’m going to work on the tail feathers here. Notice that I start from the bottom and move them out like sun rays. We want them to follow the curve of the turkey’s body…

Step by step drawing lesson

Turkey drawing lesson

Lets add a rounded face and let’s not  forget the waddle… (That’s that red thing that hangs off its face)

Tutorial on how to draw a turkey

We can start giving our turkey some personality and life. I’m also going to go ahead and put in some environment with a shadow underneath.

Use app to learn how to trace turkey

To ground it a bit more, you’ll see that I’m adding in some fall pumpkins to decorate the space. Feel free to put in some leaves or even another Turkey as a friend!

Fun and easy turkey drawing for kids

Lastly, is shading and detail. I’ve added some feather patterning, and cross hatched a lot of shading.

Learn to draw quickly

Because the Turkey is covered in feathers, the sketch-like effect really helps build texture rather than smoothing out everything.

Sketch of turkey for thanksgiving 2020


And as always, don’t forget to sign your art! You did an awesome job. 🙂

If you want to find more of my artwork, follow me on Instagram at @Phoenix.Animations. Be sure to check out the Da Vinci Eye app, as well as subscribe here for more tutorials.

—

You can also watch the tutorial on how to draw a turkey below. Have a great day, and we’ll see you next time!

How to Draw an Owl

Hey guys! It’s Sean – I’m an artist-instructor with Da Vinci Eye. Today we’re going to learn how to draw an owl perched on a tree branch.

I’ll be drawing this on my tablet for you to easily see, but feel free to use a pencil and paper. You can also follow along with this tutorial step-by-step using Da Vinci Eye App for iOS and Android. The app lets you trace along with my drawing to help become more comfortable and understand exactly what I do.

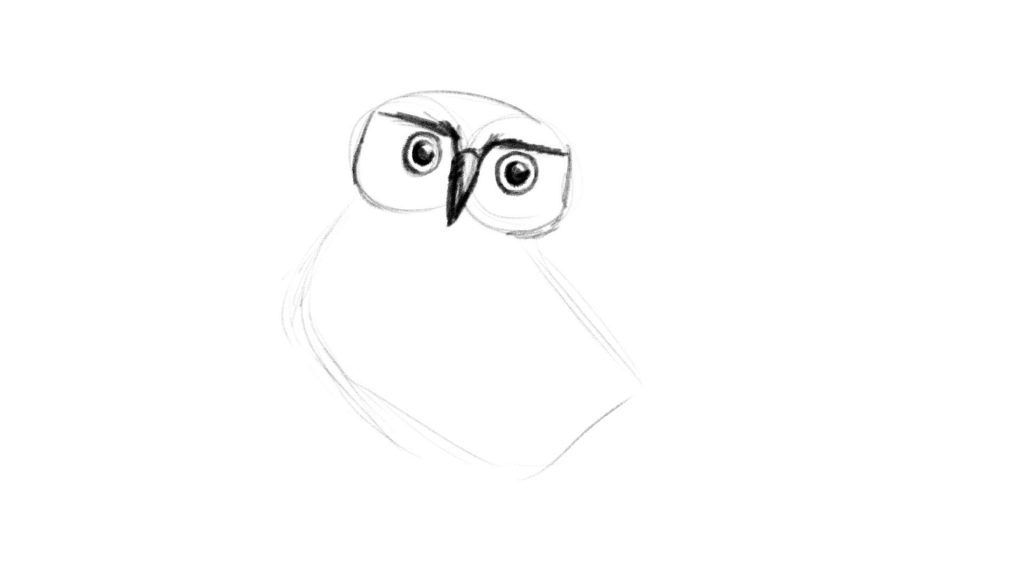
So let’s do this! Remember to start out light. So using little pressure with a pencil, draw two circles for the face:
Step by step Owl drawing tutorial

And a curved rectangle for the body:
Step by step Owl drawing tutorial

Now I’m going to jump right in and start shaping the face out.
Easy drawing lessons with iphone app

I add a carrot looking shape right in the middle for the beak and two wide eyes.
How to draw an owl lesson tutorial for beginners

Remember the owl’s eyes don’t actually move. So make sure the pupils are always in the middle.

Now I’m going in and adding details for feathers:
How to draw an owl lesson tutorial for beginners
Then texturing around the eyes:
Easy owl drawing lesson

As well as two short tufts for the ears:
How to add tufts to your owl drawing

Moving to the body, we need to give our owl a big wing.
Drawing wings for your bird or owl

I always like to pattern my wings, so go ahead and add your own feather coloration.
Owl wing feather patterns

I decided for the chest of my owl to be a much whiter color and indicated this by only lightly penciling in feathers in a downward direction.
Instructional video lesson owl drawing tutorial

The talons are added to curve around our tree branch, but you can also stick them under your owl.
How to add talons to your owl drawing

Lastly, I’m going in to add detail to the branch and give the owl some tail feathers in the back.
How to draw an owl in 2 minutes!

Don’t forget to sign your art! You did a great job.

If you want to find more of my artwork, follow me on Instagram at @Phoenix.Animations. Be sure to check out the Da Vinci Eye app, as well as subscribe here for more tutorials.

You can also watch the tutorial on how to draw an owl right here:


Have a great day, and we’ll see you next time.

How to Draw Photos Bigger with App

How to Draw Large Pictures with Da Vinci Eye!

Hey Everyone! On today’s post, we are going to show you how to draw LARGE pictures with Da Vinci Eye. You can use this method on both iOS and Android.

If you don’t already have the Da Vinci Eye app, you can download it here:

Download Da Vinci Eye on iOS

Download Da Vinci Eye Android

Getting Started

For this lesson, we are going draw this photo to fit a 14 x 17 piece of paper:

How to draw tutorials with Da Vinci Eye App


1. Start by drawing a large circle. This is just for reference so draw this pretty light. This is going to represent how big the head is going the be. (Note that I made my circle roughly the same shape as her head)

How to Draw Large Pictures


2. Enlarge your image to match the size of the circle. You are basically making a hole, then sticking the face in it!

Fun easy drawing lessons

*You can now erase the circle you made as you won’t need them anymore*


3. Begin to trace the reference image as you normally would. The secret here is we want to make some areas as exact as possible because we are going to use these areas as reference points later.

You’ll notice that because your phone’s camera is so close to your paper, you can only see a small section of the paper. So how do we draw the other parts of drawing?

That’s easy… We just move the phone to where we want to draw next! Make sure to follow the next steps in order to correctly do this!


4. Press the move button, and with just *1 finger*, move the image to align with your reference points. In this case, I’ve drawn the lips in pretty fine detail… so I am going to use those as my reference point.
 Just get it pretty close because you can just nudge your cup to get it precisely aligned.

How to Draw Large Pictures

*Do not forget to press the move button again when you are done aligning your image.*


5. Now just keep repeating this step of drawing a section, moving, and aligning.


This whole outline took less than 5 minutes!

How to Draw Large Pictures


*This same process works for an iPad!*


This wraps up our tutorial on how to draw large pictures in Classic Mode! Don’t forget to upload your pictures in the app on iOS or tag us on Instagram! 

@DaVinciEye

If you have any questions please reach out via the email button in the app or directly Sam@DaVinciEyeApp.com

Never stop stop creating…